¶ How to Setup Optimize?
Updated on 31 Jul 2024 • 16 Minutes to read
In this article, we will learn how to optimize your AI Groups with Pixis's Optimize feature.
The Optimize feature helps you optimise your AI Group performance. It does this by analyzing:
Your performance of campaigns/adset under the AI group
The metrics you want to improve
Your budget allocation for the AI Group.
For instance, suppose you're running a campaign for an e-commerce website aiming to increase website purchases. Your main metric is conversions (purchases). You have set a daily target of achieving 100 conversions, with a CPR (Cost Per Result) target of $5 per conversion. Your total daily budget allocation for the campaign is $500.
Based on this information, along with historical performance data and your inputs, Optimize generates Bid, Budget, and Creative Rotation recommendations to optimise your campaigns and achieve your campaign objectives.
The "Optimize workflow" section outlines the precise configurations you need to perform
¶ Optimize Workflow
The workflow provides an overview of Pixis Optimize feature. To Optimize your AI Group, you need to configure the following:
Objectives: In this step, you'll choose the AI Group you want to optimize. This is where the system will initiate the integration of historical campaign data for the result metric.
Optimization Goals: Here, you can add your targets. These targets can be both cost and scale based. You also have the option of choosing your optimization preference: Autonomous or Custom
Spend Goals: Here, you can schedule budget plans for your AI Group. The budgeting can be either Daily or a Custom period based on the requirements.
Action Levers: Action levers determine the type of recommendations required (bid, budget, and Creative Rotation) and more!

Optimize Workflow
¶ How to Navigate to Optimize?
You can click on the "Optimize" option from the left panel under Pixis+. The Optimize Dashboard will open in a new tab.

Pixis+ navigations
¶ Select AI Group to Optimize
You will find a list of AI groups tagged under the AI Group drop-down in the top right corner. Here, you will see the status of each AI group.
Configured AI Groups: These are AI Groups for which the Optimize setup is completed to generate recommendations.
Unconfigured AI Groups: These are AI Groups for which you have yet to set up the Optimize workflow.
You can click on the AI Group for which you want to configure Optimize.

Select AI Group
Once you select the AI Group, you can start the Optimize process.
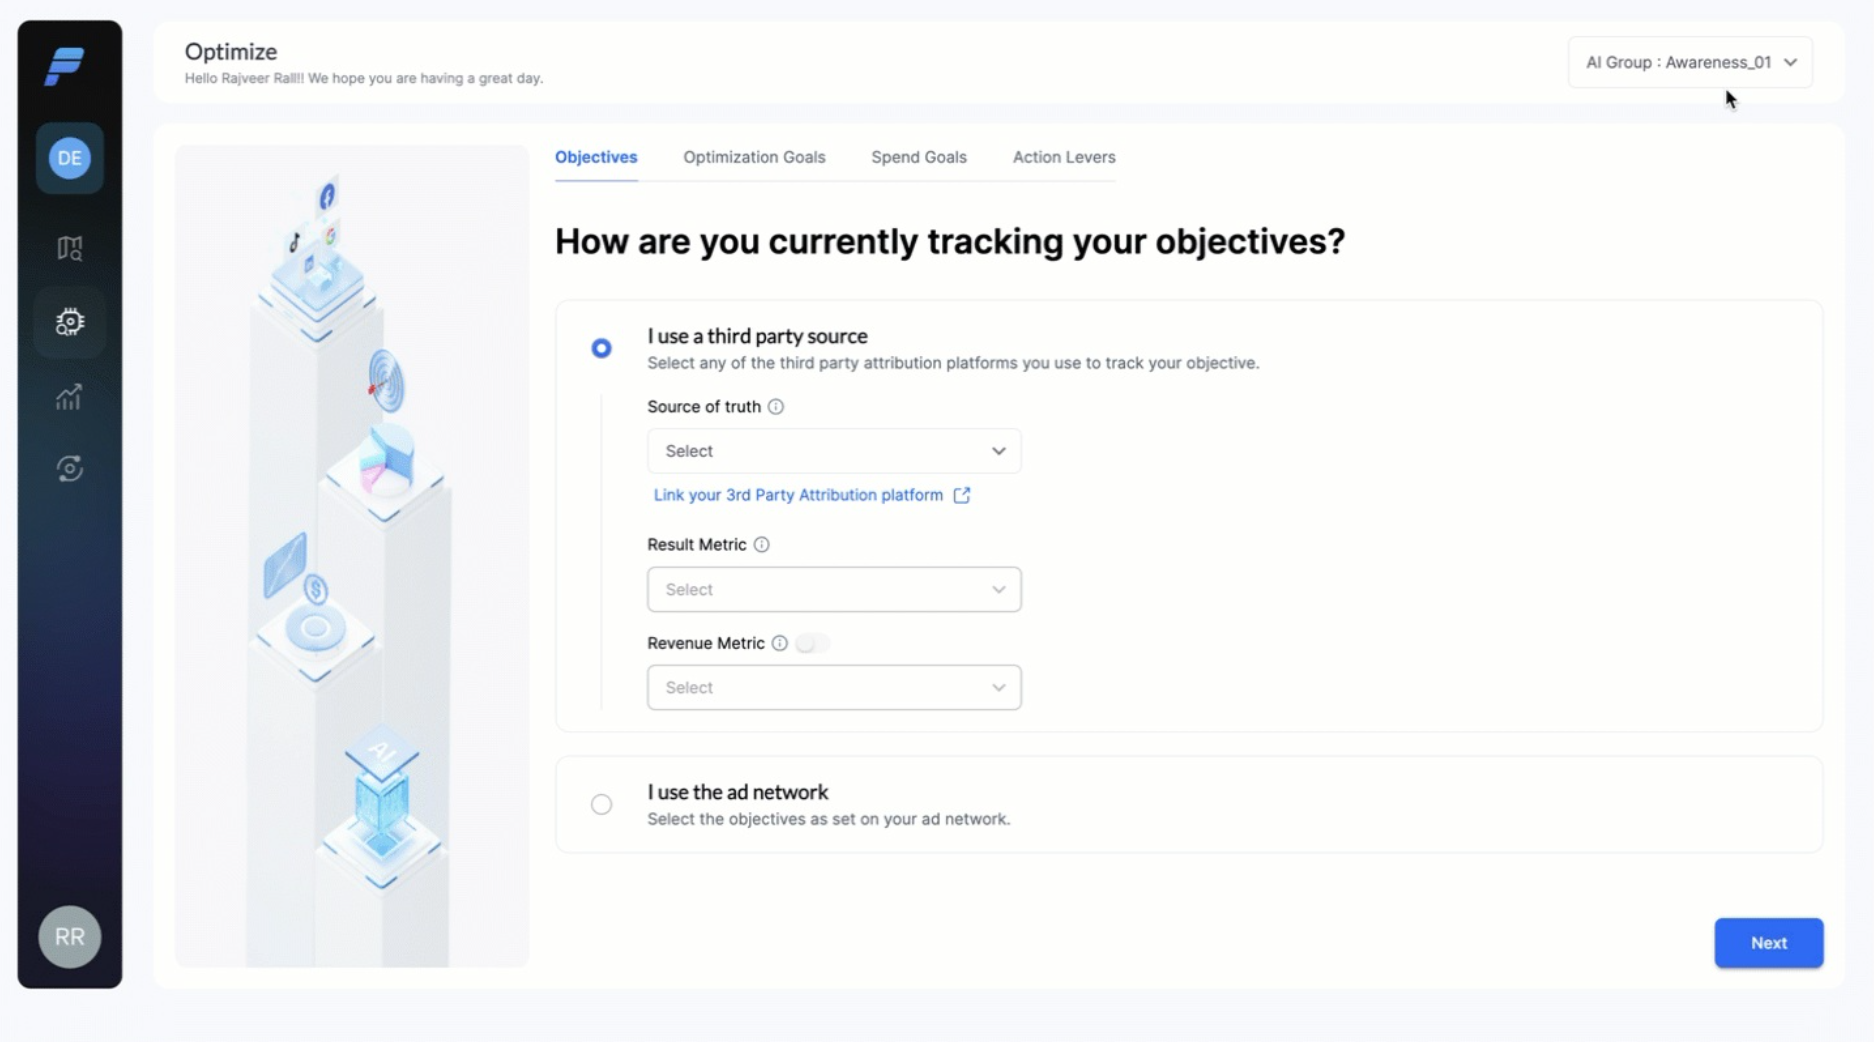
¶ Step 1: Add Objectives
Under Objectives, you can select your source of truth and define the result and revenue metric for your AI Group. Objectives help the platform understand your campaign goals and how they are measured. You will be asked to select how you track your campaigns.
You can track your campaign objectives based on the following two options:
I use a third-party source
I use the Ad network
¶ Third-party Source

I use a third party source
¶ Source of Truth
This section contains a list of third-party platforms that you have connected with Pixis. If you haven't added any third-party platforms yet, you can visit the Pixis Accounts Manager to add them. Once added, you can come back to the Optimize section and find the newly added platform in the dropdown list by refreshing the page.
To set up a third-party platform as your source of truth, see the Integrate 3rd Party Google Sheet article.

Selecting Third Party Source from dropdown
¶ Result Metric
The Result Metric represents the specific key performance indicator (KPI) used to measure the effectiveness of your ad campaign. For example, if your objective is conversion, select "Conversions" as the Result Metric.
¶ Revenue Metric (Optional)
The Revenue Metric represents the monetary value generated by the Result Metric. Once you enable the toggle, you can select a Revenue Metric. Also, you cannot choose the same metric as the Result Metric. For example, if you've selected "Conversions" as the result metric, you can opt for "Conversion Value" as the revenue metric.

Selecting Result & Revenue Metric
¶ Ad Network

I use the ad network
If you select the ad network as the source of truth, you need to configure the following:
¶ Result Metric Name
Choose a Result Metric name that matches your AI Group objective. For example, if your goal is conversions and your KPI is website purchases, name the Result Metric "Purchases." This naming will also help you set up the Target Cost Metric in the next step.
¶ Channels
You will find all Channels(Ad platforms) that are present in that AI group. The table includes the Name of the Ad account, Ad account ID, Platform Logo, and Tag.
¶ Result Metric
Against each channel, you will have this mandatory field to add the result metric associated with that particular channel. For example, if your AI Group objective goal is conversion, you can select the result metric as “Conversions”.
¶ Revenue Metric
The Revenue Metric represents the monetary value generated by the Result Metric. Once you enable the toggle, you can select a Revenue Metric. Also, you cannot choose the same metric as the Result Metric. For example, if you've selected "Conversions" as the result metric, you can opt for "Conversion Value" as the revenue metric.
¶ Attribution Window
Select the attribution window according to your campaign type. This option is enabled only for the Facebook channel, as this input does not apply to other platforms. The default metric is the same as that set on Facebook.
Next, you can configure Optimization Goals for your AI group.
¶ Step 2: Optimization Goals
Optimization Goals help AI understand the targets you want to achieve. This enables Optimize to enhance the performance of campaigns under the AI group based on the target metrics you want to achieve, such as maximising return on ad spends (ROAS), minimising cost per result (CPR), and increasing daily conversions.
You have to configure the following:
Target Cost
Target Scale
Optimization Preference
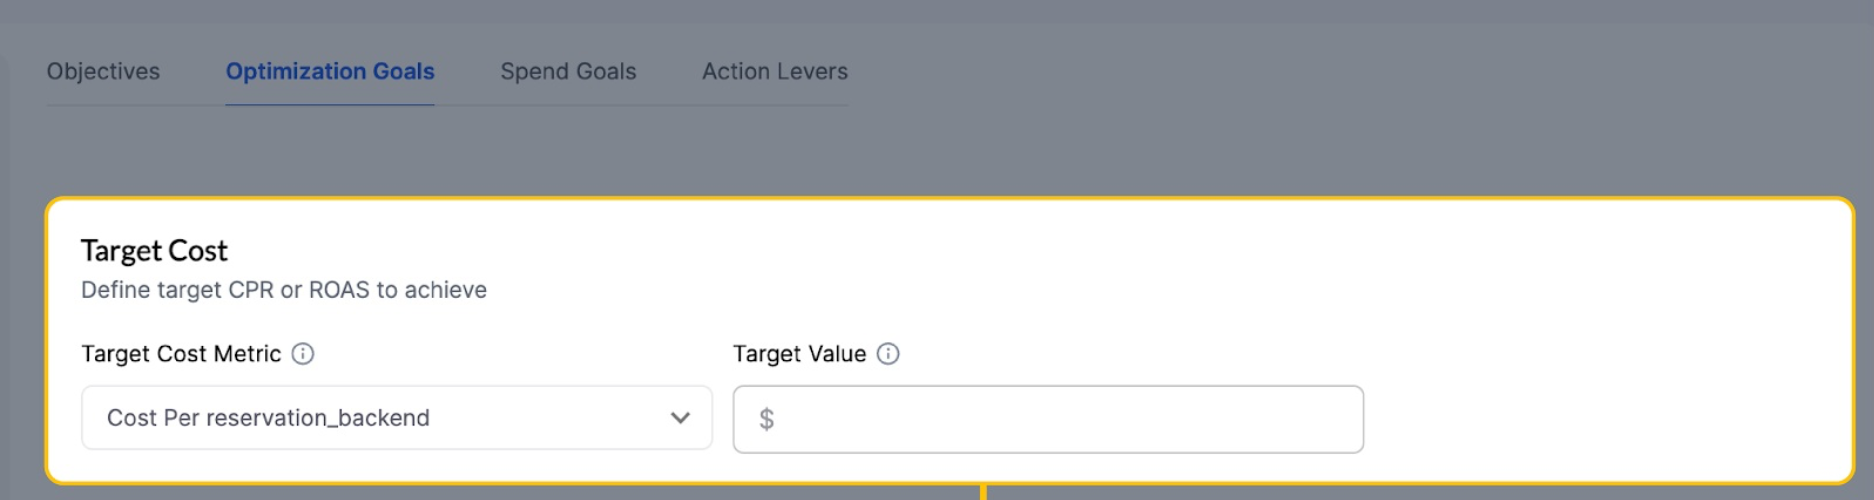
¶ Target Cost
Target Cost is a Mandatory Field
¶ Target Cost Metric
The Target Cost Metric represents the specific cost goal you aim to attain, whether it's Cost Per Result (CPR) or Return on Ad Spend (ROAS).
This will be a dropdown input parameter with two options: Cost Per Result and ROAS.
Cost Per Result (CPR): The average cost incurred to achieve a specific Key Performance Indicator (KPI) such as a conversion, lead, or purchase. For instance, it represents the amount spent to obtain a single conversion, generate a lead, or secure a purchase.
Return on Ad Spend (ROAS): The average amount of revenue you want to generate for every dollar spent on ads. This option will only be available when the Revenue Metric Toggle is on, and a metric is selected during the objective step.
Note: If you selected Impressions as your Result Metric in the pervious step, the Cost Per 1000 Impressions will be available in the dropdown.
Cost Per Millie (CPM): You can set the CPM you wish to target. CPM is the cost of displaying an ad per thousand times. Example: $50 for 10,000 ad impressions, CPM = $5. This is only available if the Result Metric selected is Impressions.
¶ Target Value
When setting a target value, analyze your current performance and industry standards. Aim for improvement while ensuring achievability. For example, if your current Cost Per 1000 Impressions (CPM) is $10, you might set a target CPM of $9 to reduce costs.
If Cost per (Result Metric Name) is selected, you can add the target value, and the currency will be the same as set on the Ad platform.
If ROAS is selected, you can add the target ROAS (up to two decimal places) as the target value.
¶ Target Scale

Target scale is a mandatory field
¶ Ad account
You can review the channels within the AI group and assign the Result/Revenue Metric and Daily Targets to each channel accordingly.
¶ Result/Revenue metric
This dropdown menu allows you to choose between two options for selecting the result or revenue metric. These metrics are predetermined during the objective step. You can select one of these options to set the daily targets.
Example:
Suppose the objective of your campaign is to increase website purchases (result metric) or website purchase value (revenue metric).
¶ Daily Targets
In this section, you can input the daily targets for the chosen Result/Revenue Metric specific to each channel. If you've selected the Result Metric, you'll enter the daily Target Results, whereas if you've chosen the Revenue Metric, you'll input the daily Revenue Targets.
Example:
If the result metric selected is website purchases, you might set a daily target of 50 purchases for a particular channel. If the revenue metric chosen is total sales value, you might set a daily revenue target of $1000 for the same channel.
Always revisit your targets once in a while to ensure they are adjusted according to the performance updates in your AI Group. The ideal target should be 15-20% higher (in case of scaling up) than the actual result count.
¶ Optimization Preference
The Optimization preference feature allows you to prioritize either scaling your target results or achieving the target cost.
You can choose from the following approach:
Autonomous (Recommended): Let Pixis AI automatically determine the ideal balance between achieving your target cost and scaling your campaign for maximum results. If you're uncertain about the most effective strategy for your specific use case, you can choose Autonomous.
Custom: You can manually select your preferred strategy to optimise targets:
Cost First: This will prioritise achieving your desired CPR over scaling performance and make recommendations accordingly.
Scale First: This will shift the focus to achieving daily KPIs to improve campaign performance, rather than solely optimising cost.
Balanced: You can also try a balanced approach just in case it’s too early to decide whether cost or scale matters more.

Optimization Preference
Next, you can set up Spend Goals for your AI group.
¶ Step 3: Spend Goals
In Spend Goals, you can use the budget planner feature to efficiently distribute your budget across various channels within the AI group. This tool helps in setting budget pacing, enabling you to define budgets for either Daily or Periodic pacing.
If you do not wish to set a fixed budget or budget range, select the “Let Pixis use campaign budgets as set on the ad networks” option and click next.
Note: This option will only be available when you select “Daily” in the Period Dropdown. This option will be disabled if selected in the custom range. As for the custom period, you will have to set a fixed budget for the period.

Spend Goals
¶ Budget Plan
Name
Period
Date Range
Set a fixed Budget
Set a budget range
Action Constraints
¶ Name
Here, you can name the budget planner, which will help you distinguish it from other budget plans if it is created for the same AI group in the future.
¶ Period
When setting a budget for your AI Group, you can choose to set a daily budget or a custom budget.
If you choose "daily," you'll set a specific amount of money to spend each day.
If you choose "custom," you'll set an overall budget for a specific period of time, and the AI will decide how much to spend each day within that period.
Note: “Let Pixis use campaign budgets as set on the ad networks” option will be disabled when selected “Custom Date Range” as period.
When your AI Group has new campaigns, it's best to choose daily pacing since there's no historical data to rely on. However, as the campaign gets more data over 30 to 60 days, you can set a custom date range to optimize budgets based on the longer term.
¶ Date Range
You can select the date range for both the period options. While you can choose “I want to set a lifetime period” when setting the range for a daily period, this option is unavailable for the “Custom date range” period. When you have selected the Custom date range, the budget plan has to be set for a minimum of 7 days and a maximum of 84 days.
Note: You cannot create budget plans with overlapping dates.

Date Range
¶ Set a fixed Budget
You can add a spend budget for daily and periodic pacing. It ensures that the budget you set is allocated across your AI Group. Your goals might be under/overachieved.
Daily: Set a budget you want to be utilized every day across your AI Group.
Custom: Set a budget you want to be utilized within the specified date range for AI Group.
How do you decide your daily spending for AI Group?
Suppose you have an AI Group that contains three campaigns, namely Campaign A, Campaign B, and Campaign C. Each campaign has its own daily budget target. To Add a fixed daily budget for the AI Group, you need to add up the daily budgets of all three campaigns to determine the total daily budget for the AI Group. This ensures that each campaign receives its allocated budget on a daily basis, which helps to optimize spending and performance across the AI Group.

Set a fixed budget
¶ Set a budget range
You can set a “Daily Minimum Budget and Daily Maximum Budget” you want to be utilized on daily basis. Once the budget planner is set, you can see the range of the daily budget on the calendar. This option is disabled when you select Custom as Period type.
¶ Action Constraints
When configuring a budget plan, whether daily or custom/periodic, you will have the option to set Action Constraints. For both daily and custom/periodic budget plans, you can set constraints on the budget and the bid for each channel. This feature allows you to control the budget and bid for each channel. Here, you can establish both minimum and maximum mandatory limits for the budget and bid. By doing so, you ensure that all your channels actively utilize their allocated budget, regardless of their performance. This is helpful when you want to control cross-platform budget redistribution.

Action Constraints
You can add a daily spending budget for each channel by setting a minimum and maximum budget and bid limit. For example, if you're spending 100 dollars a week across five channels, you should distribute the budget accordingly, ensuring that the total budget for all channels does not exceed 100 dollars when inputting the budget values for each channel.

Add Action Constraints
The next step is to configure Action Levers to execute Pixis recommendations and automate actions for Budget, Bid, and Creative Rotation.
¶ Step 4: Action Levers
Action Levers are used to determine what type of recommendations are required (such as bid, budget, and creative rotation), the permissible percentage change allowed for each recommendation on a day-to-day basis, and the frequency at which the recommendations are to be received. In this section, you will find the actions eligible for your AI group. By default, a few actions are selected.
Currently, you have the following Action Levers to configure:
Budget Action: Supported Platforms: Google, Facebook, DV360, TikTok.
Bid Action: Supported Platforms: Google, Facebook, TikTok.
Creative Rotation: Supported Platforms: Facebook

Action Levers
¶ Bid & Budget Actions
You can set constraints on AI to only make changes under the set % change for Bid & Budget and set a frequency for how regularly to implement these actions. You can configure the following parameters:
Frequency: Set how frequently you want to automate actions. The dropdown will have the following options:
Once a Day
Once in 2 days (Default)
Once in 3 Days
Once a week
Minimum Bid/Budget change % per action: This represents the minimum percentage change in the bid that Pixis AI will apply from the last action to the current action. This percentage change can apply to both increases and decreases in the bid.
Maximum Bid/Budget Change % per action: This represents the maximum percentage change in the bid that Pixis AI will apply from the last action to the current action. This percentage change can apply to both increases and decreases in the bid.

Budget Actions
¶ Creative Rotation
With Creative Rotation, Pixis AI picks the best-performing ads and scales them while pausing poor-performing ads. You have to configure the following parameters:
Lookback Period: The time period for which you would like to analyze performance data.
During this period, Pixis AI thoroughly evaluates campaign performance, taking into account various factors such as seasonality and metric-level performance. This analysis guides decision-making regarding the scheduling of creatives, determining the most effective timing for optimal campaign performance throughout the day or week.
Max test Ads: The total number of test ads (new ads) that you want to be active at any given point. New Ads are the ads that have less than 6 days of data in the last 30 days.
Pixis AI will gradually move towards the ultimate number of ads you want to be active, as it helps the AI monitor the performance in an optimal manner, which ultimately results in better outcomes than the instant scaling approach.
Max Optimized Ads: The total number of mature ads (ads with enough data) that you want to be active at any given point.
Ideally, you should consider the number of existing ads present in your AI Group and take a fraction of it as per the risk strategy for performance optimization.
Frequency: Select how many times in a week you want to apply the changes.
Always start experimenting with the platform-suggested frequency and then try seeing the impact of other frequencies as well to know which one works best for you.

Creative Rotation
¶ Configured AI Group
Once you have configured the AI group, its status will change from Unconfigured to Configured in the dropdown menu. When you return to this AI Group in Optimize, you'll encounter the configured view, where you can make adjustments similar to those made during the initial optimization setup. Additionally, you can setup budget calendar and action flags.
Configured AI Group
¶ Configured Optimize Dashboard
Once the AI Group is configured, the Optimize Dashboard provides an overview of the setup metrics, making it easier to understand the configured parameters. Let's examine the parameters configured in the example below:
Source of Truth: The Ad Platform is selected to retrieve historical data.
Result Metric: The objective is to improve the registered leads metric.
Targets: The aim is to increase the number of registered leads to 23 per day and lower the cost per registration to Rs 266. The recommendation is scheduled for 2:30 PM EST every day.
Optimization Preference: The AI determines whether to prioritize cost or scale for optimal performance.
Action Levers: Enabled action levers include Bid recommendations, Budget preference, and Creative Rotation.
Platform Configuration: You can enabled or disabled the recommendations for the ad account(s) present in the AI Group.
Action Flag: To implement recommendations to your ad platform, select the campaign/ad set in the Action Flag.
Budget Plans: A daily budget of Rs 899 is set with a fixed spend target. New budget plans can be added, and daily spend targets can be adjusted under the Budget Calendar.
Active toggle: You can toggle this to enable or disable AI optimization for the AI Group.

Optimize AI Group Dashboard
¶ Outlier Action Limits
The Outlier Action Limit feature is a safeguard against extreme Bid and Budget changes recommended by either AI recommendation or Manual Actions. This feature prevents the implementation of drastic recommendations until it gets reviewed and approved by a Global Admin. To ensure that Bid and Budget changes stay within reasonable limits, a default hard limit is set that blocks any recommendation exceeding -50% to 100% change at the campaign and adset/ad group level. However, you have the flexibility to adjust these default limits as per your specific requirements.
Note: You will see the recommendation status as "Waiting for Approval" under "View Recommendation" until a Global admin approves or rejects it.

Configuring Outlier Action Limits
¶ Action Flags
If you want to execute the recommendations on your Ad platform automatically, you can turn on the Action Flags for specific campaigns and/or ad sets. By doing so, you can ensure that the recommendations are executed automatically at the scheduled time. Additionally, you have the option to receive email notifications for these actions.

Setting Action Flags
¶ Budget Calendar
The Budget Calendar displays the daily budget for your AI Group. Here, you can adjust the fixed daily budget for specific days according to your pacing strategy. For instance, during holidays, you may want to increase or decrease the budget based on your campaign strategy.

Editing Daily Targets in Budget Calendar